

How To Enable Vpn Connection In Windows 10
A Virtual Private Network (VPN) is basically an add-on that is added to public networks such as WiFi hotspots and the internet to make communicating over them more secure and less vulnerable to 3rd-party exploitation. Virtual Private Networks are vivid tools for anyone who wants to brand certain that the data they send and receive over a public network is not accessible to the entirety of the populous that has admission to the network. To proceeds access to the information transmitted over a Virtual Private Network, a person needs the credentials required to first gain admission to the Virtual Individual Network itself. VPNs are generally used past corporations and businesses and any other establishments that need to keep the information communicated inside them from being accessed past any 3rd-party.
In a Virtual Individual Network, the Point-to-Point Tunneling Protocol (PPTP) is used to brand certain that the messages transmitted from i VPN node to another VPN node over the cyberspace (which the entire populous has access to) are secure and invulnerable to existence accessed by anyone who isn't authorized to admission them. The ability to set up and use Virtual Private Networks and VPN connections comes built into all active iterations of the Windows Operating System out there – and that includes the latest and greatest version of Windows, Windows 10. If you desire to set up a VPN connectedness on a Windows 10 reckoner, you demand to first acquire the credentials yous will demand to access the VPN server you want to connect to. The required credentials include the proper noun or the IP accost of the VPN server you want to connect to and the username and password that yous have registered on the VPN server. Once you accept this information, to set upward a VPN connection on a Windows x computer, you need to:
Click on the Network connectedness icon in the reckoner's System tray. If the computer is connected to a WiFi network, the icon will look like a WiFi indicate. If the figurer has an Ethernet connection, the icon will expect like a computer with an Ethernet cable on its left side. In the menu that pops up, click on the blueish Network settings link at the lesser.

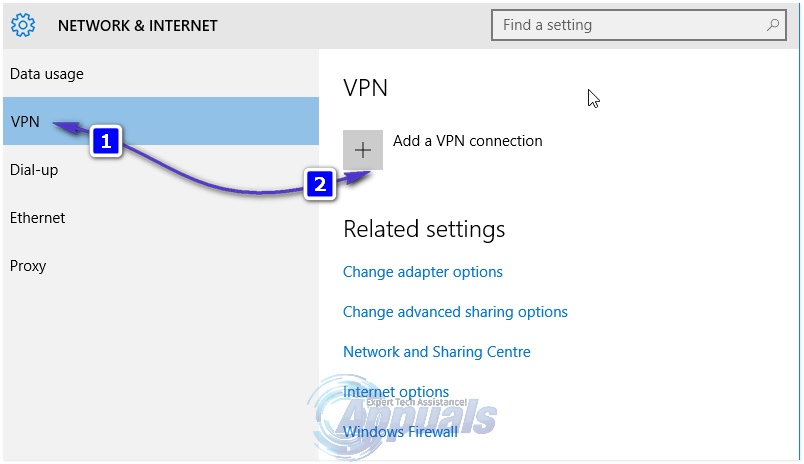
This volition open the Network & Internet settings Navigate to the VPN tab in the left pane of this window. In the right pane, click on Add a VPN connection.
Populate the Add a VPN connexion window equally follows:

VPN Provider: Windows (built-in)
Connection name: <Type in the name you want to give your VPN connection>
Server proper noun or address: <The proper noun or IP address of the VPN server you want to connect to>
VPN type: Betoken-to-Bespeak Tunneling Protocol (PPTP)
Blazon of sign-in info: User name and password
User name (optional): <The user proper noun you lot have registered on the VPN server>
Password (optional): <The password for your business relationship on the VPN server>
Enable the Retrieve my sign-in info pick past clicking on the empty checkbox abreast information technology and checking it.
Click on Save.
As soon every bit you lot click on salvage, the VPN connexion will have been created. All you need to do in order to connect enable the VPN connection and connect to the VPN server once the connection has been created is to but navigate to the VPN tab in the Network & Cyberspace settings window, click on the VPN connection that y'all created and click on the Connect button.
If you want to enable the VPN connection you take created and connect to the VPN server always more quickly, merely click on the WiFi or Ethernet icon in your System tray and, from the list of all available connections, click on the VPN connectedness yous would similar to enable and click on Connect.
![]()
Source: https://appuals.com/how-to-set-up-a-vpn-connection-in-windows-10/
Posted by: dvorakbefave.blogspot.com
0 Response to "How To Enable Vpn Connection In Windows 10"
Post a Comment